
C O N F U S E D ?
T o o m a n y b u t t o n s . . .
L i g h t i n g . . .
W E C A N H E L P ! ! !


C A M E R A F E A T U R E S E X P L A I N E D
Gene’s Photo Studio offers a class explaining features on your camera with on-site shooting. One hour explaining the features and One hur on-site, your location (Mineola only)………………………………………………………………………………………………$99


Does my camera have a digital level?
Electronic Level - is a feature on most digital cameras. It helps you keep your images level …vertically and horizontally. By pressing the “info” button repeatedly, the level will appear. The electronic level on your camera allow you to check you camera’s tilt so that you can correct it. Both the horizontal and vertical tilt are displayed, allowing you to make corrections in both planes.
You can simply move your camera in either direction, while keeping an eye of the electronic level. As your tilt the camera, you’ll see the red line changing between red , yellow and green.
Red indicates that your camera is on a tilt. Yellow indicates that you’re colose to detting it level. When re line turns green, it indicates that the tilt has corrected.
Features of a digital camera…
Resolution - This term refers to the sharpness, or detail, of a picture. The higher the number of pixels, the higher the resolution. Picture size is measured by how many pixels make up an image and is measured by horizontal by vertical resolution, as in 1280 x 960. The manufacturers break this down to about 5 main different categories of resolutions, expressed in mega pixels. Here is the breakdown:
1 megapixel cameras - these are nearly obsolete. They are good for posting images to the Internet, looking at images on a moniltor,and e-mailing photos. Cell phones and camcorders tend to have around 1 megapixel capability.
2 megapixel cameras- the maximum resolution here is 1600 x 1200, which is better than the resolution of most computer monitors. Also good for posting pictures to the Internet, viewing images on a monitor, and e-mailing. It can also print images up to 8x10 inches, and will allow you to do basic graphics work.
3-5 megapixel cameras - a 3 megapixel camera will print up to 11x14 inch images. If you are not a professional, this is probable as detailed as you need to get. It does everything a 2 does, plus allows you to do professional graphics work. The cost of a 3 megapixel camera is much more reasonable than that of a 4 or 5, but still allow you to have great flexibility in use.4 and 5 megapixels cameras will have even larger images and print sizes.
Memory - Digital cameras store pictures as data files rather than on film. The size of your memory determines the number of pictures you can take before downloading the images to a computer, at which time you can go back and fill the memory up with new pictures. Most cameras come with only 8 megabytes (MB) of memory, which for a 2 or 3 mega pixel camera could be only 10 - 40 photos. More memory is available by buying removable memory, such as a memory card. Th type of memory you buy will be determined by the type camera that you buy. 128 MB of memory is a good starting place, allowing you to take a good number of photos before having to download to you PC.
Flash Type -A flash, of course, is the extra light needed to shoot inside or in low-light conditions. Most digital cameras have built-in flash with a range of 10 - 16 feet. Other flash option include:
Red Eye Reduction - Two flashes are emitted, the first to contract the iris so that the eye doesn’t reflect as much light with the second, which keeps the friends and family member from looking fiendish in the photo.
External Flash - More powerful the automatic, this allows you to attach the flash to the camera and place it strategically. The types include “flash sync” and “Hot Shoe.” Cameras that include external options will generally have automatic flash as well.
Burst Mode - known also as Rapid Fire and Continuous Shooting mode. In genera, there is a 1 - 2 second time lag between pressing the shutter button and a picture being taken with a digital camera. Then there is a 2 - 30 second recovery time before the camera is able to take another photo. With the Burst Mode feature you can take several pictures in a row. This us useful for taking shots in motion, such as children playing sports events.
Optical Zoom - there are types of zoom lenses, digital and optical. Digital zoom simply enlarge the picture adding any clarity of detail. The same thing can be done with editing and cropping software. Optical zoom will do what you really want; add detail and sharpness. The larger the lens (2x, 3x, which is standard, 4x, etc.) the more picture taking flexibility you have.
Compression - this process shrinks the file size of an photo. Uncompressed photos are clearer, the files are enormous and require huge amounts of memory. JPEG format compresses the files, allowing you to store more, save, download, and e-mail photos at a faster rate. For general use, JPEG is fine.
Power Source - digital cameras are voracoious eaters of batteries. They use either a rechargeable battery pack or traditional batteries, usually 2 - 4 double A. Some have an AC adapter as well. For rechargeable batteries, which you want unless you really like to buy a lot of batteries, and often, NIMH batteries can be charged up to 1,000 times, while while Lithium Ion batteries can also be charged up to 1,000 times and last twice as long as NIMHs.
Lens - lens length will determine how much of a scene will fit into a picture. Some cameras have fixed focus lenses, which are preset to focus at a certain range. These pictures typically focus between a wide angle lens and normal range Many cameras have auto focus, which pick an item in the center of the viewfinder around which to focus.
Focus and Exposure - most cameras have auto focus, but higher end cameras will include a manual focus capability. Panorama picture taking is available as well as various types of light sensitivity. For instance, a camera rated at ISO 100 approximately the same light setting as a normal camera using ISO 100 film. The higher is ISO setting, determined by the aperture, the less light a camera needs to take a good image.
LCD Screen - this screen will let you see what the photo will look like and typically, let you see what you’re already taken and erase what you don’t need. The screens use a lot of power, but are very desirable for editing purposes. Some cameras will let you display multiple picture on the LCD screen at one, usually 9 or 12 at a time.
Self-Timer - this is an option that lets the photographer be included in the photo. Self-timers have a pre-set delay, usually giving about 10 seconds to run into the shot. There are also camera with a remote control option to work the shutter.
Manual Features - available on high end cameras, these give more serious photographers more creative control. They include things such as focus, aperture, speed, and shutter speed. You will need to read the options carefully, as each camera can have a different meaning for manual.
What are focus points?
Focus points are what your camera uses to focus. They’re basically little dots that exist all around the frame.
If you have a single active focus point in the center of the frame, your camera will part of the scene in the center of the frame (i.e., the area that sits “under” the focus point).
Whereas if you have a single active focus point in the corner of the frame, your camera will focus on the part of the scen in the corner of the frame.
Just to confuse you a little more… focus points can either be active or inactive. Active focus points are used by the camera to acquire focus, whereas Inactive focus points lie dormant (but can be activated by changing the AF area mode).
Software / Firmware?
In electronics, specifically, any device that does computing, you will run into the terms software and firmware, The difference between the two can be a little hard to define as they both, in general, refer to data stored within a hardware device.
Software: Software is most often meant to describe a program or piece of data that is meant to be viewed, changed or otherwise interact with most often by the user.
Firmware: Firmware is a term for a piece of software that is stored on a hardware device in order to make it run properly. It is not really meant to be interacted with by the user once it is there. The firmware, once installed, is usually changed infrequently and only through updates from the manufacturer. Loss of firmware can often lead to a hardware device losing function entirely depending on the situation.
Depth of Field preview button …
Ever wondered what that button is around the lens mount of your dSLR?
It’s not the button you press to take the lens off the camera. On most modern dSLR’s there is another button that is usually dedicated to - depth-of-field preview.
Depth of field, or DOF, is the range between areas in an image that look sharp. It’s easiest to think of it in terms of photos you are already familiar with. Landscape photos that have most of the image sharp and in focus have deep depth of field. Portraits with the subject in focus but a background blur have shallow depth of field.
The DOF preview button helps you determine what photos will look like before the image has been taken. When the button is pressed, the lens will stop down to the aperture that you have set. Then, you will be able to see a preview of what the final image will look like through the viewfinder.
Depending on your camera, the button is usually situated near the lens, where your thumb or forefinger can press it without too much effort.
The “f” in f-stop
The “f” in f-stop stands for the focal length of the lens. While focal length itself refers to the field of view of a lens, f-stop is about how much light you allow to hit the sensor via the aperture opening. The aperture is the hole in the middle of the lens, made up of rotating blades that open to let in light when the press the shutter release. The diameter of the aperture determines how much light gets through and thus how bright your exposure will be.

Composition…
Sometimes, it helps to take a step back from broader discussions on creativity to look at ht e truly fundamental elements of composition. Although there are countless elements of composition in art as a whole, these are the most important that are specific to photography - critical parts of nearly every photo you take. They’re divided into two main categories; objects, and their relationships. These are nothing less than the building blocks of creativity.
Objects - The first six elements of composition ae simply different types of objects you may find in a photo, ranging from simple to complex. These elements do not depend on anything else in a photo, or upon the borders of your composition itself. Every object in your photography exhibits these characteristics to a degree, sometimes obviously and sometimes hidden.
Points - The simplest element of composition is a point. Points are a bit deceptive; mathematically, they have zero dimensions. Photographically, we’re a bit more lenient. A point is just a small area of interest in a photo, or the intersection between areas of interest. Points matter in photography because they are one of the most fundamental ways to draw our attention- to add interest to a particular area.
Lines - In contrast to points, which draw a viewer’s attention, lines are most like a path for a viewer to follow. Or, they are a boundary: the division between sky and ground, for example. Like points, lines in photography ae not defined as rigidly as lines in geometry. Photographically, anything that connects two parts of a photo or stretches across your composition is a line. Lines also serve an important function of connecting two different elements of your photo. sometimes, lines in a photo are imaginary, but they’re still there! Lines don’t have the same weight as points. Instead, they connect points, or divide them, or guide a viewer’s eye toward the one you want. This makes them some of the most important elements of composition.
Shapes - Now, we move from the simple elements of composition to the complex. Shapes can be anything, from the crescent moon to the shape of smiling face. Each variey of shape has its own emotional impact on a photo, and it’s impossible to generalize. In photography, keep an eye out for shapes in you photo, either obvious or abstract. Remember that they are very powerful in drawing our eye - particularly siimple shapes, as well as those of humans and animals.
Texture - The texture of an abject plays an important role in determining its emotional impact, as well as the amount of attention it draws. Sometimes, textures themselves may be the subject of your photo, like patterns in the sand or waves of water. More often, though, textures are individual elements of a larger photo= either giving your subject some dimension or filling in the spaces between subjects
Color - Other than black and white photography - a creative choice of its own - color makes a big difference to the composition of a photo, as well as the mood. Each color brings its own emotion to photography. The most important distinction you need to know at the moment is that of warm versus cool colors.
Warm colors are red, orange, and yellow. They are active, jumping to the front of an image and conveying more movement and excitement.
Cool colors, then are opposite: green, blue and violet. Therse are calmer colors, with a bit more gentleness to their nature. Blue and green in particular are the most common colors found in nature.
Tone - Another important element of composition is tone, both for individual objects and for the photography as a whole. although tone can refer to hues and intensity of color, it also relates to the brightness and darkness of an image, as well as its contrast.
Relationships The other elements of composition fall under a different category: relationships. Rather than applying to individual objects in a photo, the four elemnets below are all about the different parts of photo interact.
Distance -The simplest relationship between elements of composition is the distance between them. Distance matters for a few different reasons. To start, if some of your subjects are too close together - or if one subject crosses another - the results can be distracting. An important part of a photo has its own “breathing space”.
Balance - The next element of composition is balance, related closely to the concept of visual weight. Visual weight isn’t complicated; It’s just the amount of attention each object in your photo attracts. Every part your photo has has some amount of visual weight to it. Balance is about the arrangement of visual weight in a photo. A balanced photo has similare levels of visual weight between the left and right halves; an imbalanced photo has more weight on one side of the other.
It’s worth noting that you don’t always want your photo to be perfectly balanced between the left and right sides. Although balanced photos often feel more natural and harmonious, imbalance is more dynamic, with a sense of tension that works for certain photos.
Space - (Positive and Negative) Islands and water; cloud and sky; ink and paper. Positive and negative space.
Positive space is any part of the photo stat attracts attention. Negative space is the “filler” between regions or positive space. It doesn’t necessarily fade into the background like cool colors tend to do, but it isn’t the portion of the photo that attracts the most attention. Photos with high amounts of positive space feel crowded, while photos with high amounts of negative space feel empty. Niether of these sounds like a particularly good emotion, but both canbe very powerful in a photo!
Patterns - In photography, patterns are everywhere. This isn’t just something small like a texture that repeats itself thughtout the photo, but really in any repeating element at all. That’s what patterns do, really. They tie photos together. They give photos a reason to exist - a strong statement for whey the photographer took this photo and some other.
Conclusion - Most other techniques in composition - from simplicity to emotion - start with the elements of composition listed above. Although there are more than just ten elements of composition, these are the most important for photographers to know.
Memory Cards…
Compact Flash (CF Card) - is regarded as the memory card for the professional photographer. These are physically much bigger than SD cards, and less commonly used. They often have bigger capacities and can run at very high speeds.
Secure Digital - is the basic format of the SD card. They usually perform well, but not as fast as other SD cards. These are limited to 4GB; anything above would be an SDHC card.
Secure Digital High Capacity (SDHC) was created to meet the high demands for high-definition photography and video. Any SD card above 4GB of memory is an SDHC card. Currently, these are limited to 64 GB, and anything higher is classed as an SDXC card.
Secure Digital Extended capacity (SDXC) is essentially a beefed-up SDHC card. These cards start at 64 GB and can reach a size of 2 TB.
Micro Secure Digital (MicroSD) is a micro version of the SD card, as the name indicates. It has the same storage as the SDHC card, storing up to 32 GB of data - and can transfer up to 10 MB per second.
Extreme Digital Picture Card (XD) is a removable le flash memory, designed for use in digital camera. It has a compact size.
Compatibility - Memory cards will only work if they are compatible with the proposed camera.
UDMA Rating (Ultra Direct Memory Access rating) Memory cards are graded for 0-7, with 0 being the lowest and 7 the highest performance. Not all devices support all speeds, so check before you buy.
Reading Speed - This is the rate at which the memory card can record and store the images you capture. This is the most critical speed.
Micro SD cards can be used as standard SD cards when used with an adapter.
Prime lens vs a Zoom lens
A Prime lens is a lens with a fixed focal length, typically with a maximum aperture of f / 1.2 - f 2.8. They’re fantastic for videographers and photographers who want the best optical quality and prefer a shallower depth of field in their images. Popular prime lens focal lengths are 35 / 50 and 85 mm.
A Zoom lens is a lens with a variable focal length, allowing the user to adjust their focal length in its specified zoom range. This allows for grater versatility and flexibility when shooting. Popular zoom lenses include 16 - 35mm, 24-70mm and 70-200mm, with a flat aperture of f 2.8 preferred by professionals, due to the better low light performance.
Focal length - The focal length of prime lenses can be anywhere between 12mm and 5200mm, and it will always remain the same. Zoom lenses, on the other hand, have zoom rings that allow you to use a range of lengths. This gives the latter a definite advantages as it eliminates the need to change lenses or zoom in and out with your feet, as you would with a prime lens. Another advantage of having the choice to use different focal lengths is that it allow you to easily and quickly add variety to your shots and adjust your framing so you don’t have to waste precious seconds and risk losing those split-second, picture-perfect moments
Aperture -While prime lenses rate low in versatility and flexibility compared to zoon lenses, they make it up by being able to offer much wider apertures (or smaller f=-numbers).
With fast primes that have maximum apertures like f 1/4 or even f 2.8, you are able to let more light into the camera sensor. This helps brighten low-light scenes and allows for the use of faster shutter speeds. Prime lenses also offer more control the depth of field and can produce very attractive bokeh (the visual quality of the out-of-focus areas of a photographic image) through the use of very shallow depths of field.
Size - Both prime lenses and zoom lenses come in different sizes. It’s not true that prime lenses are always smaller and shorter than zoom lenses, since there are much longer prime telephoto zoom lenses. However, the most useful primelenses are more compact, given that most photography styles don’t require focal lengthes past 200 mm and the focal lengths don’t change. Zoom lenses, on the other hand, can be small and the widest focalllength but it extends when you zoom towards the long end of your lens.
Weight- Another stark difference between prime and zoom lenses is their weight. Although there are “lightweight” zoom lenses, a zoom lens generally contains more glass elements than a prime lens. And when you have several zoom lenses, the combined extra weight could make it difficult to shoot and travel with.
Price - Unsurprisingly, prime lenses generally cost much less as they contain much less glass compared to zoom lenses do the manufacturing cost tends to be lower - but that might not always be the case. You’ll find that some of today’s zoom lenses are pretty affordable. It greatly depends on the other factors that could increase their value (like wider apertures for zoom lenses and improved image quality for prime lenses) so when it comes to the price, it’s a tie.
Sharpness and Quality -Today’s zoom lenses are capable of capturing some of the best quality images. However, prime lenses have been around as long as photography itself, and this has allowed camera brands to improve on it earlier and maintain its slight edge when it comes to image quality.
Gray card . . . 18% . . .?
A Gray Card is exactly as it sounds: A card that is gray. More specifically, a gray card is generally middle gray, or 18% gray. They tend to be small, portable, light, and easy to whip out of a camera bag when necessary.
Remember a gray card is middle gray, also known as 18% gray. This number is important because 18% is what your camera’s meter is trying to calculate when it determines a correct exposure for a scene. If you put a gray card in front of your subject and take a meter reading, you will get a balanced exposure regardless of any tonal contrast in the scene.
Now, you might be wondering: What about my camera’s meter? Why can’t I rely on it for a good exposure?
Camera meters are very, very good, but they make mistakes, especially when faced with significant tonal contrast, as well as scenes that are naturally very light or very dark.
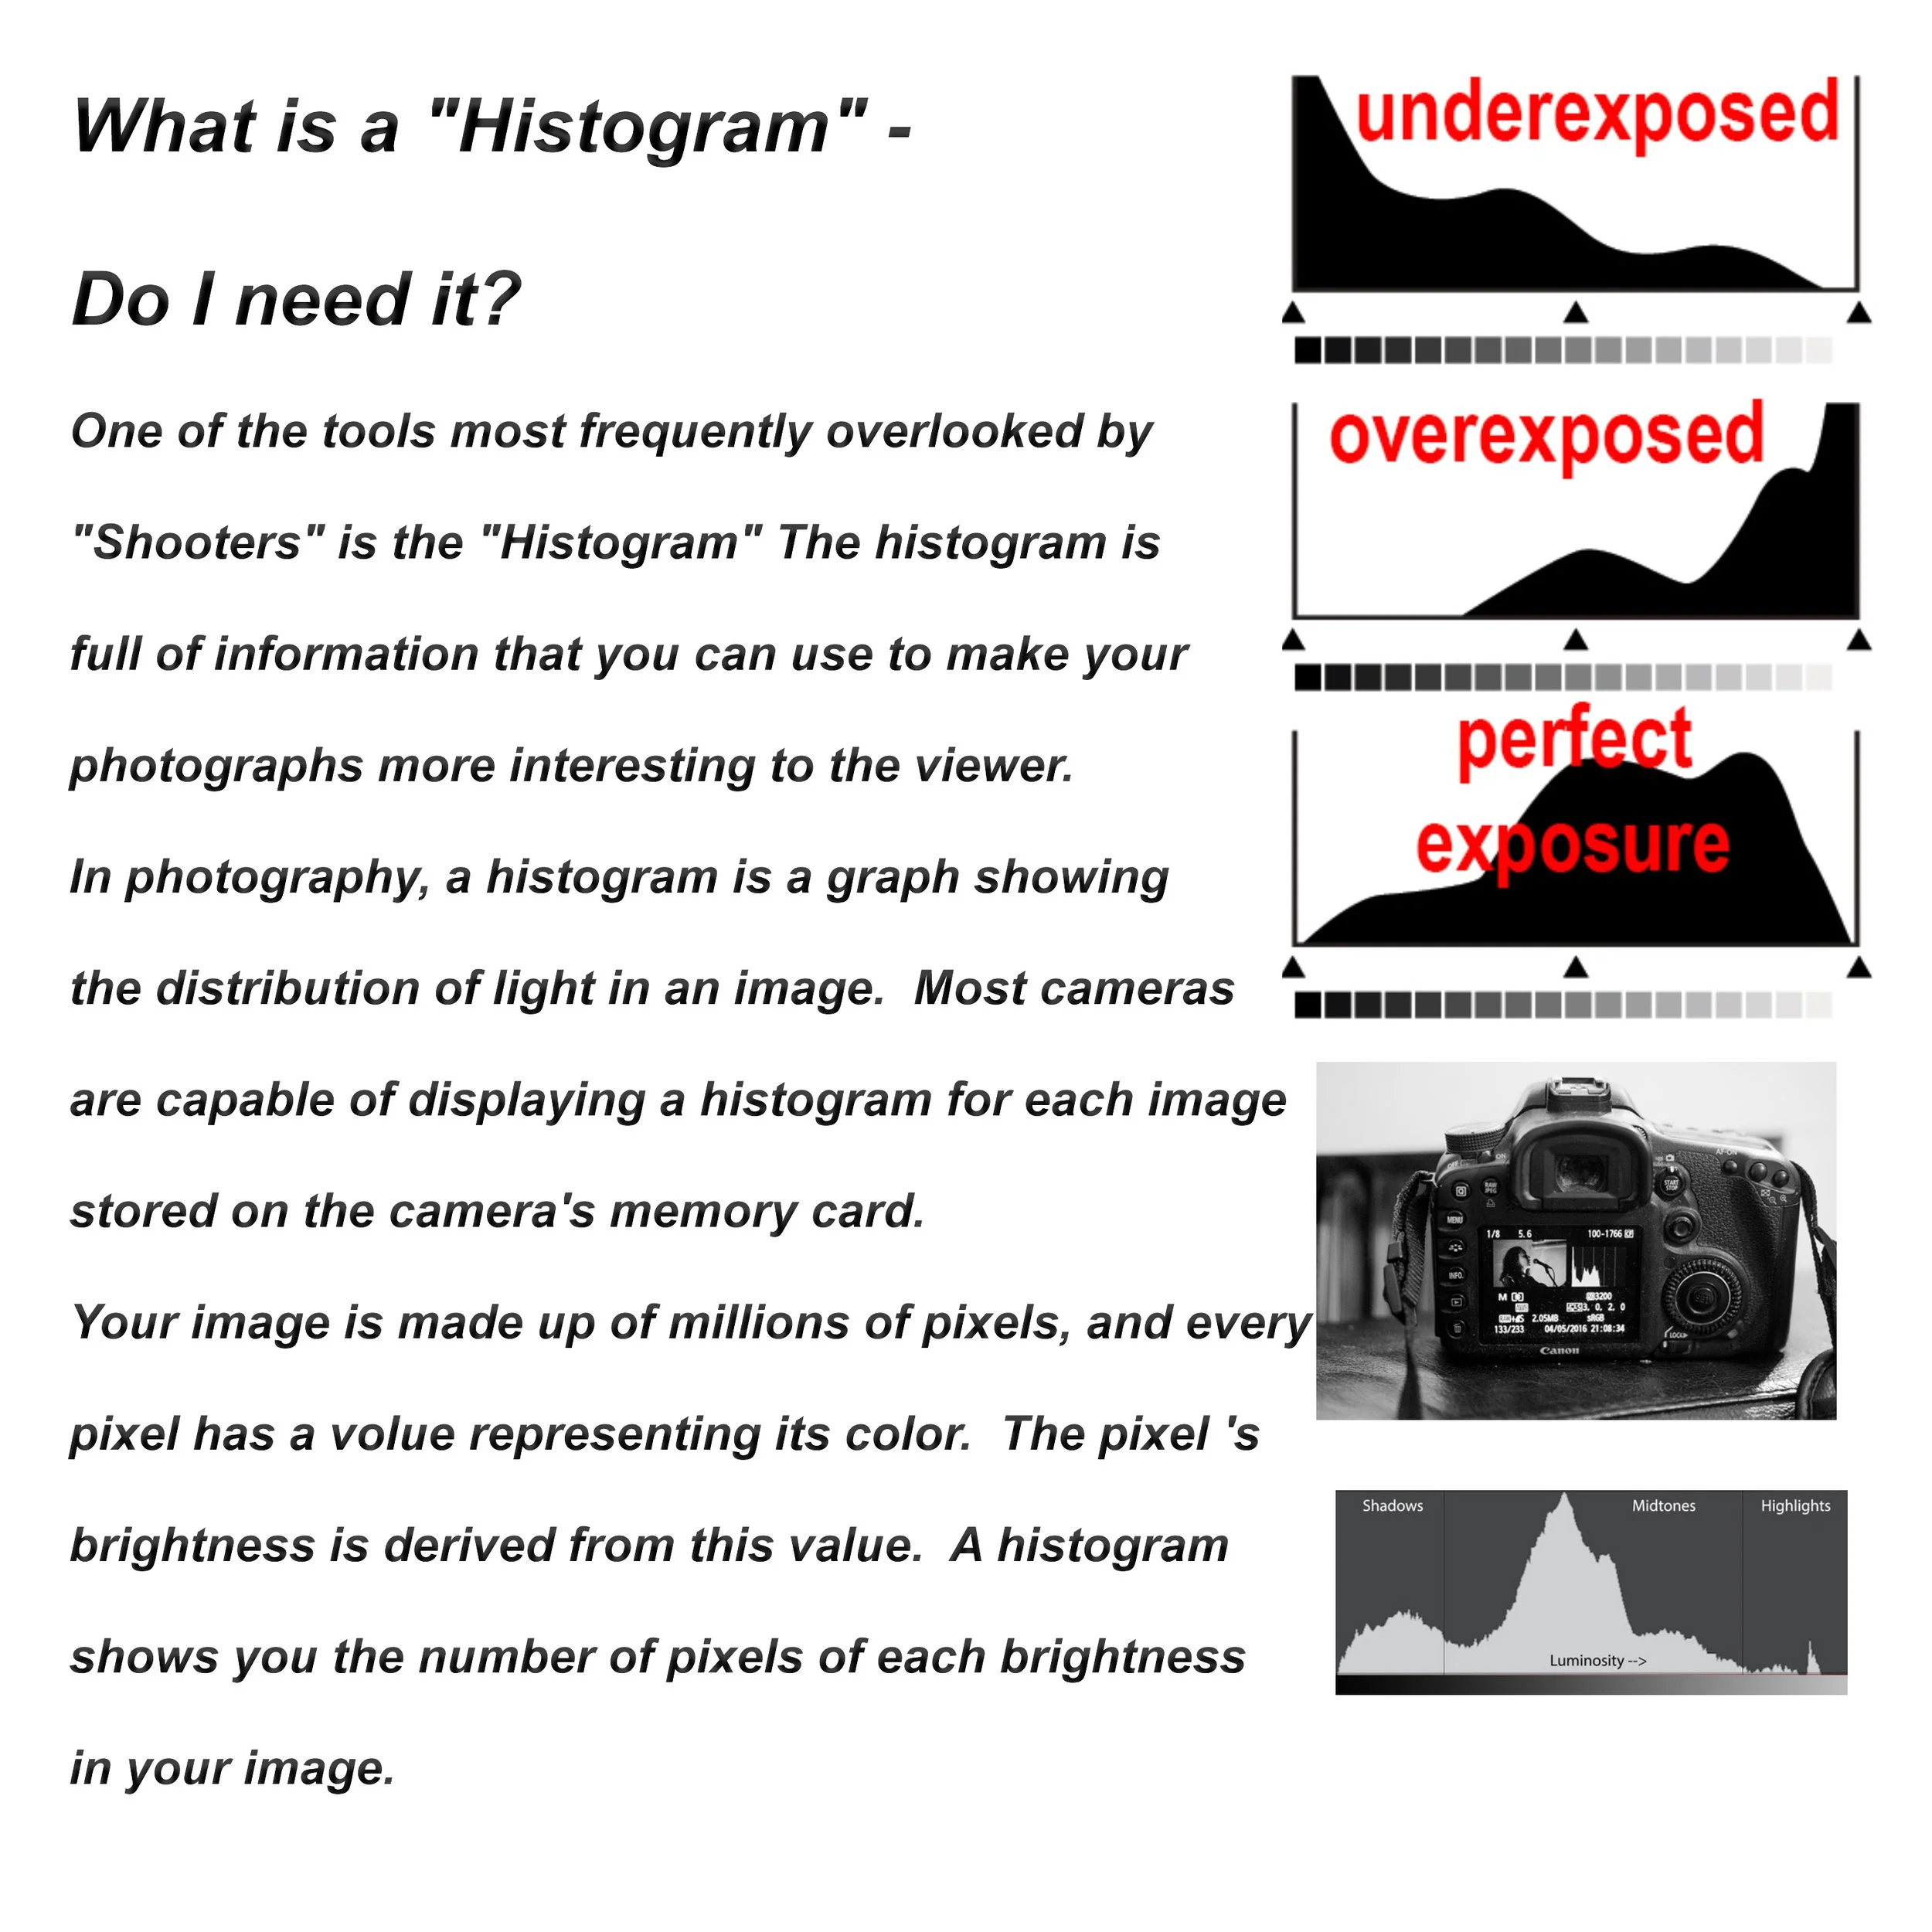
What is a histogram?
A histogram is a graph that measures the brightness of an image by representing the frequency of each tone as a value on a bar chart. The horizontal axis moves from pure black on the left side of the histogram, through shadows, mid tones, and highlights, all the way to the brightest white on the right side. The vertical axis represents the frequency, or intensity, of each tone, with peaks for high frequency and valleys for low. Most digital cameras have both a luminosity histogram (measuring total brightness) and color histogram (measuring the intensity of red, green and blue tones).
Left side run-off - If you see high-frequency tones or peaks running off the left side or your histogram, that means your blacks are being clipped, and your camera is not picking up all the shadow detail that it might. This type of “low-key” image might be what you’re going for, but if it isn’t, you can let in more light by lowering the shutter speed, widening the aperture, or raising ISO (light sensitivity) of your camera. Each pf these fixes can reduce the image quality, but you can experiment with slight adjustments to all three to get the combination of brightness and sharpness that you want.
Right side run-off - If you image is “high-key,” you might expect peaks on the right side of the histogram. But if those peaks are cut off the right edge, the image may be overexposed, meaning the highlight details washed out. In this case, take a shorter exposure, narrow your aperture, or lower the ISO to reduce the light your camera is capturing.
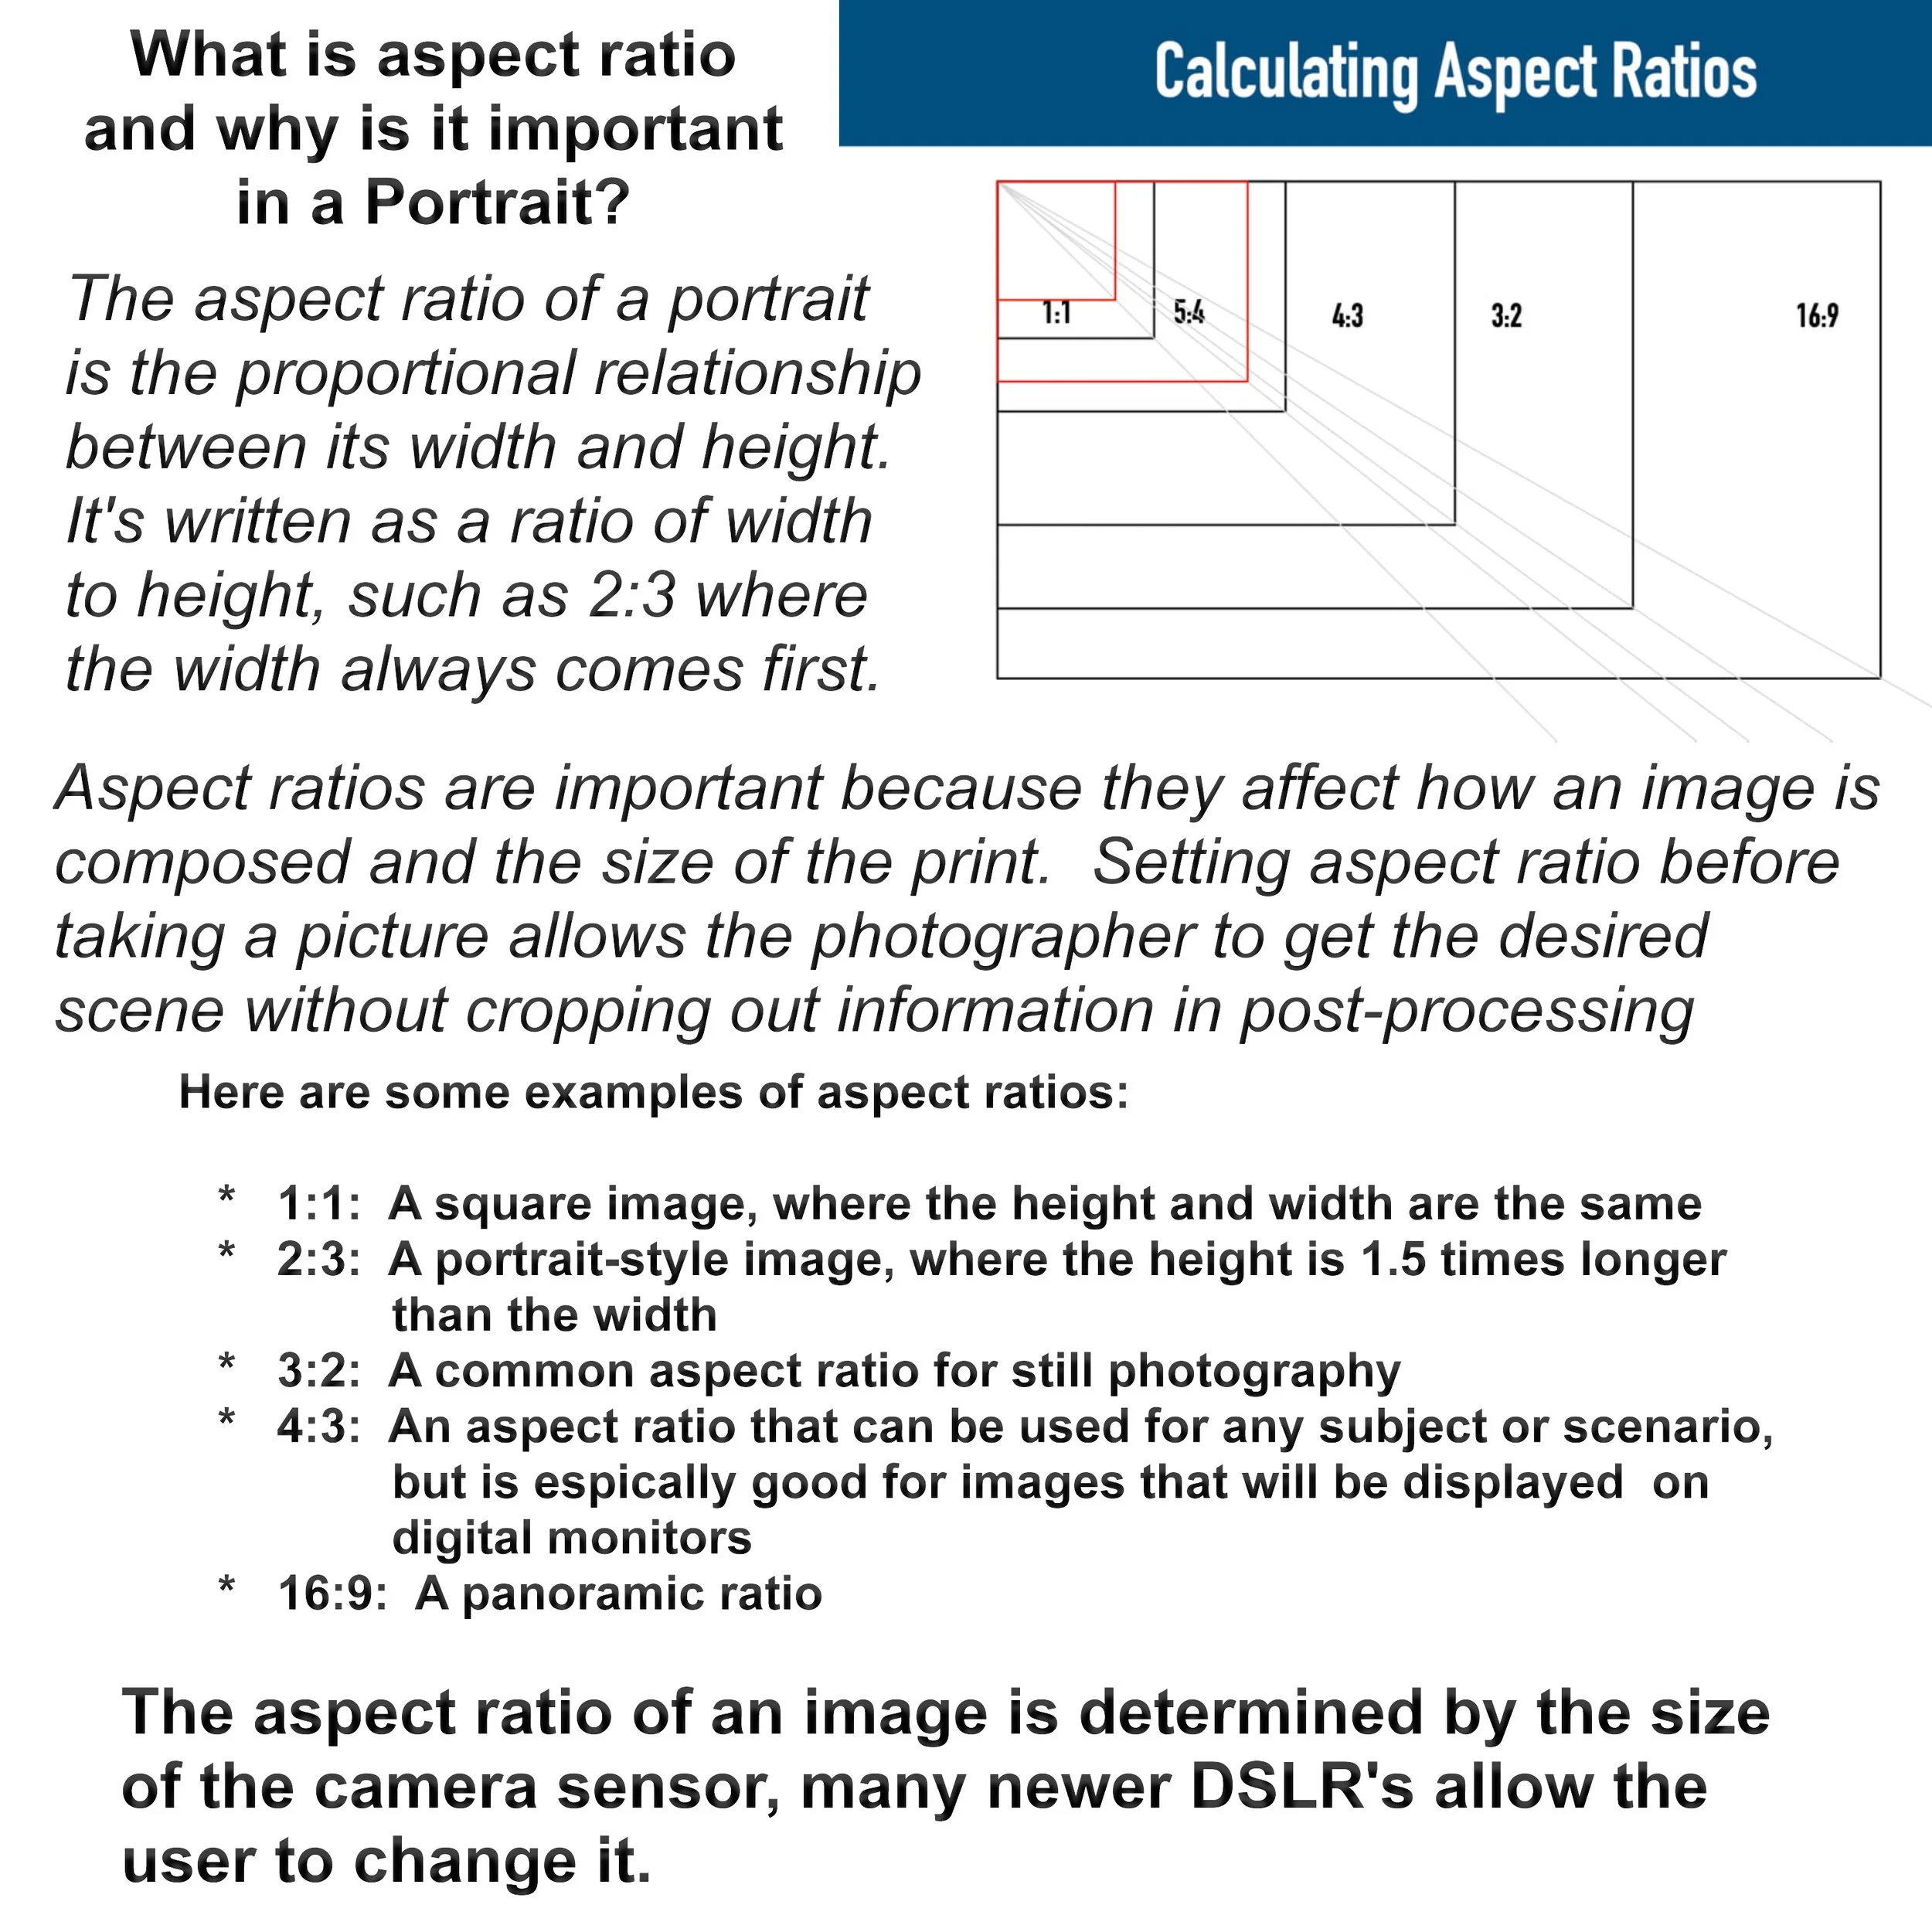
What is Aspect Ratio?
In photography, aspect ratio represents the relationship between the width and the height of an image. It can be expressed as a number followed by a colon and followed by another number, such as 3:2, or by a decimal number such as 1.50 (which is simply the long side divided by the short side).
You can easily visualize any aspect ratio by allocating units to the width and the height of an image. For example, a 4:3 aspect ratio would consist of 4 equal size units for its width and 3 equal size units for its height.
What is H D R ?
HDR - Stands for high dynamic range. dynamic rang is simply the rang of the lightest tones to the darkest tones within a photo. put another way - it’s a measure of light intensities from the highlights to the shadows. However, it can be more challenging to capture the same image on camera that our eyes sees. cameras have a shorter dynamic range, meaning they catch fewer details than our eyes.
The higher dynamic range your camera has, the closer the photo will compare to what an eye can see. This means that you’ll be able to capture more details in the shadows that might otherwise appear pure black, and you’ll be able to see details the highlights that might otherwise be washed out with white.
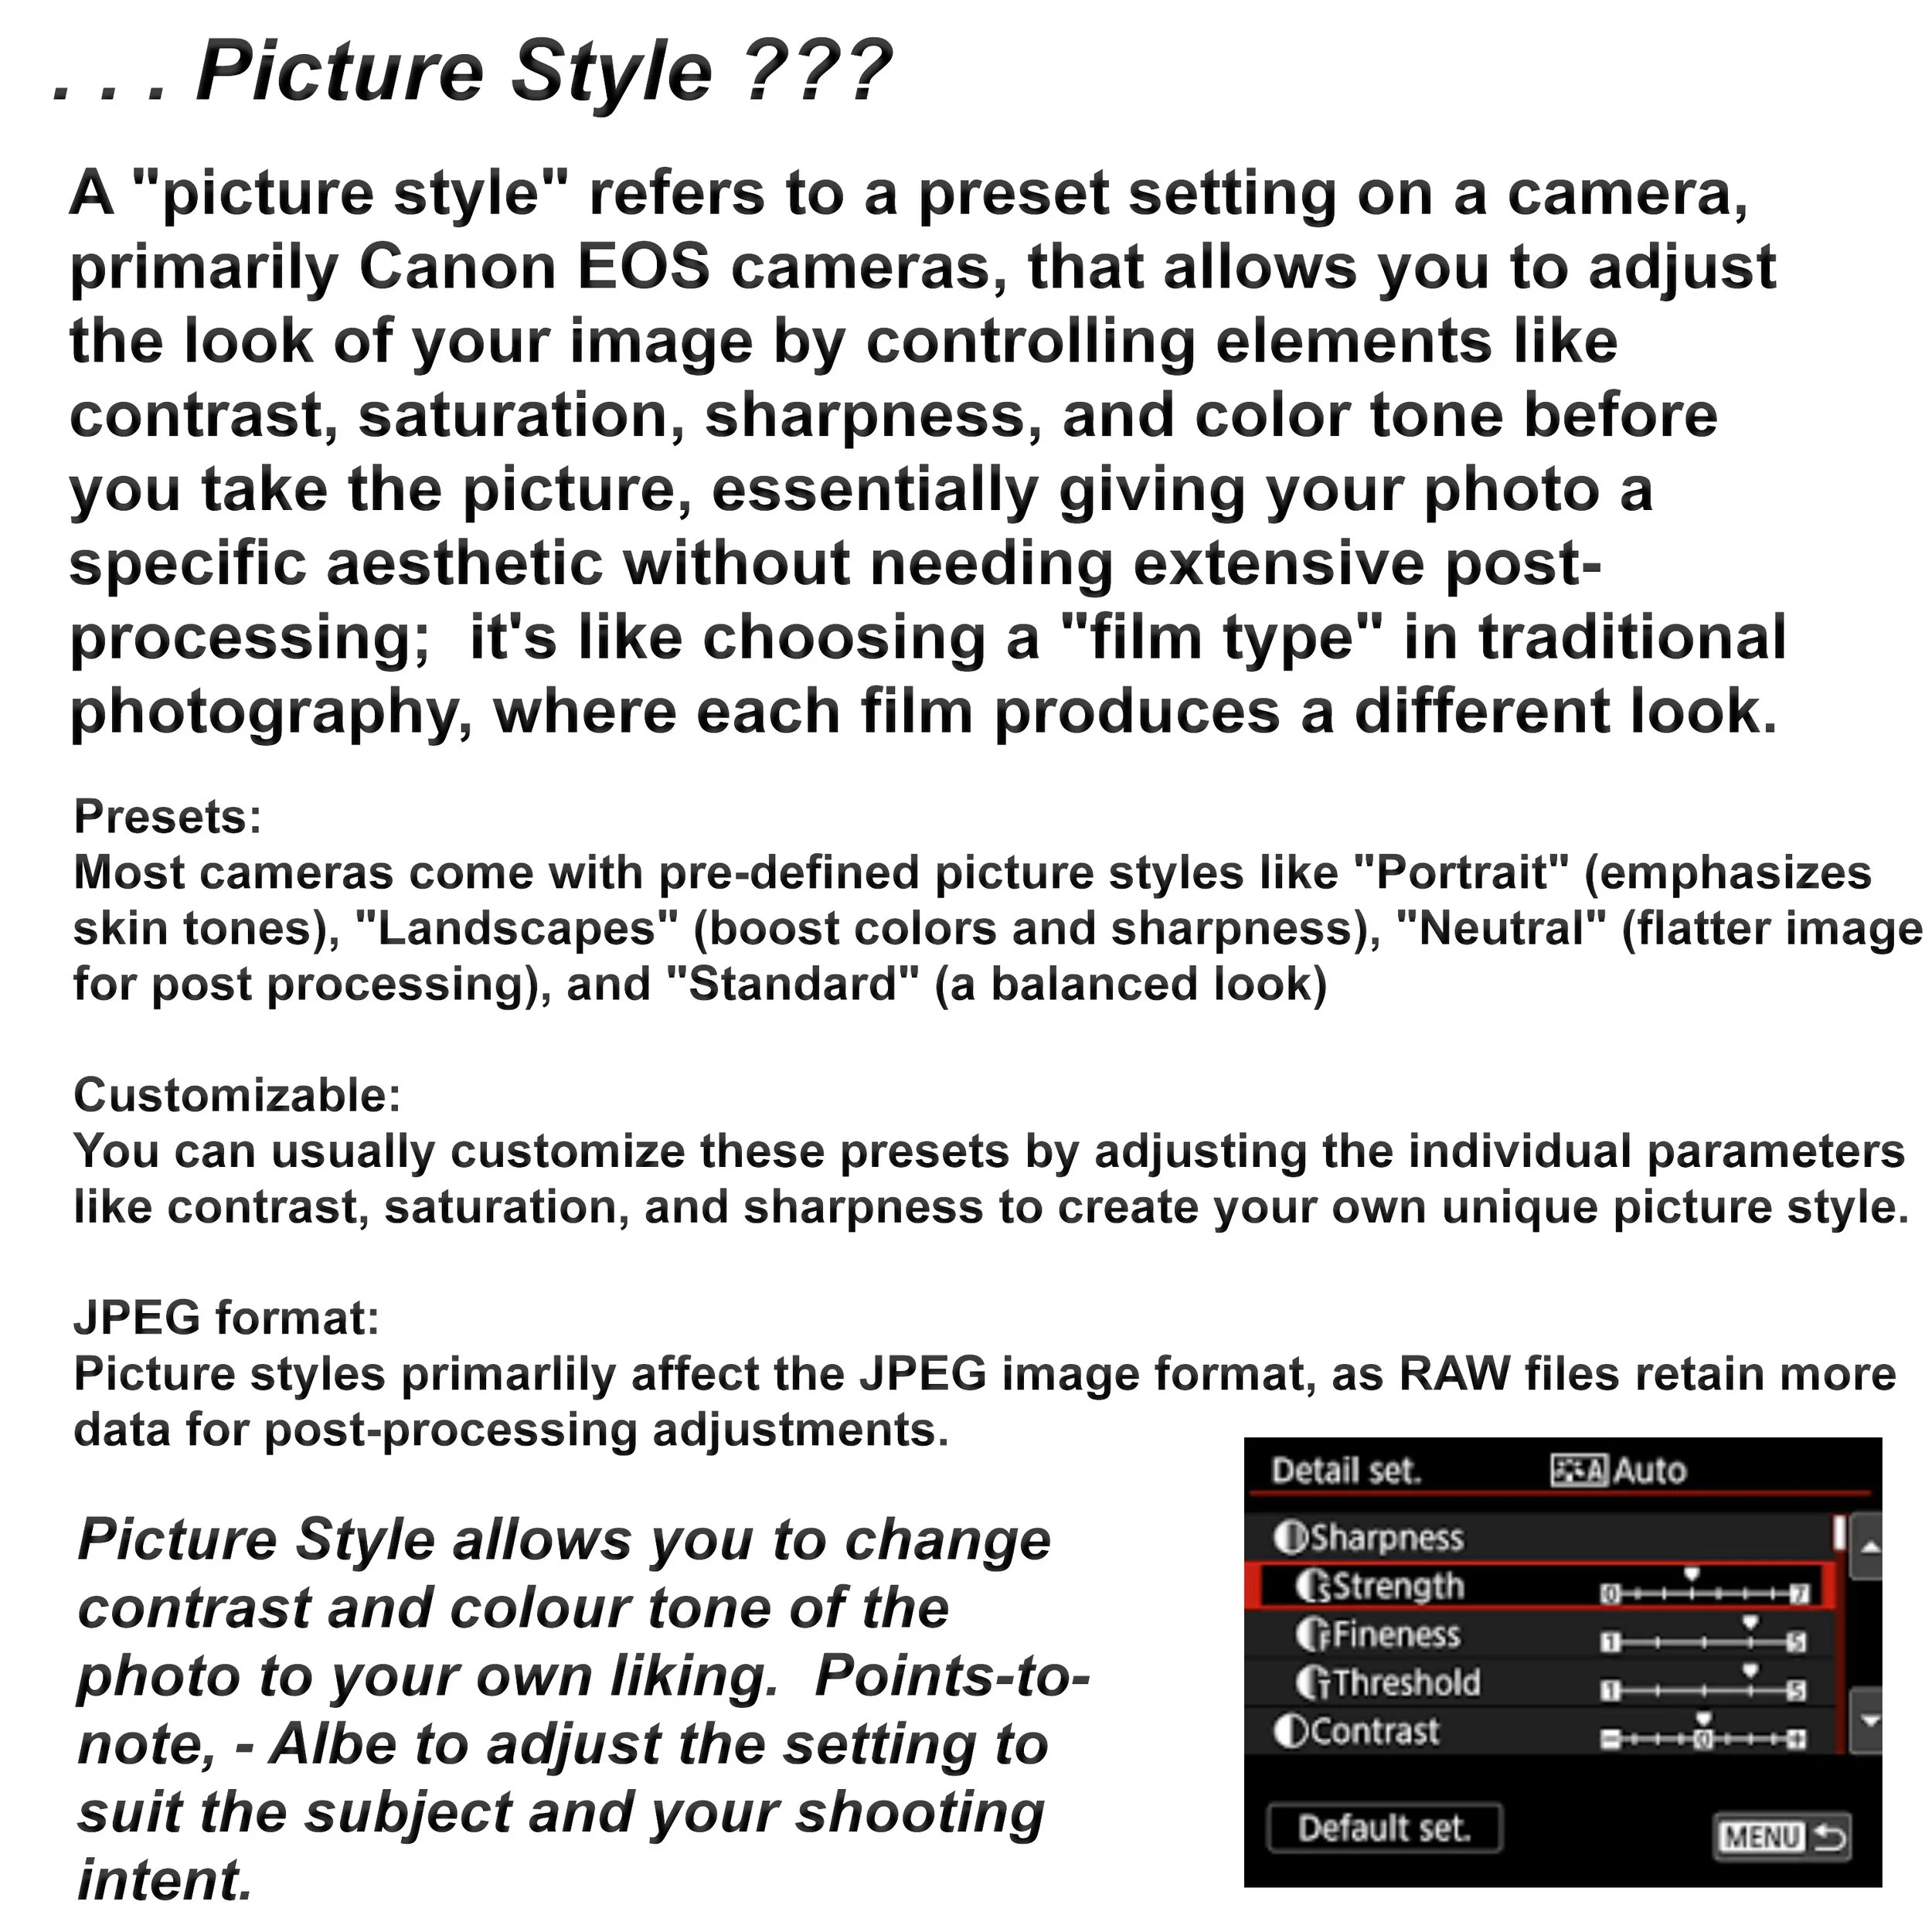
What are picture styles?
Picture styles adjust the sharpness, contrast, saturation and color tone of your image. Just like editing programs, these setting have a slider.
Sharpness refers to the artificial sharpening and edge definition with the camera.
Contrast refers to the relationship between the darks and lights in your image. More contrast means the darks and lights are more defined. Less contrast makes the image more muted and matte.
Saturation refers to the power of colors and how vibrant they are.
Color tone is the adjustment of the hue (the attribute of a color by which it is discernible as red, green and so forth)
Default Picture Styles on newer cameras, there are six default picture styles built in the camera. Although their names gives a bit away about what you can expect from them, here they are in more detail.
Standard - This is the default mode of the camera picture style. Standare is set to be crisp and vivid, for the layman photographer to capture a high-quality image!
Portrait - As the name entails, portrait mode is for, well, portraits. The goal of portrait mode is to optimize skin tones and saturation. It also reduces edge sharpness to keep the skin looking softer.
Landscape - Nature photographers rejoice, the landscape mode is here to aid you! According to Canon, it produces ‘punchier greens and blues with stronger sharpening for crisper-edged mountain, tree, and building outlines’.
Neurtal -The neutral prictue style is excellent for photographer who prefer moodier results. Neutral reduces saturation and contrast. It can give the photo a washed-out or vintage look.
Faithful - The faithful and neutral picture styles are a bit difficult to tell apart as they are very similar. however, Faithful show you what you’d see when shooting under average daylight.
Monochrome - Exactly what you’d expect - black and white!
What is color space?
The simplest explanation of color space is that it is the range of colors shown in a photo. There are two mail color spaces used in digital photography. Both have their advantages and disadvantages, depending on where and how an image is viewed.
The two main colr spaces are sRGB and AdobeRGB. An easier way to understand this is to think of color spaces as pallets of watercolors. AdobeRGB being one set with ten colors on it, and sRGB being another with five colors.
What is white balance?
White balance is a cameras setting that establishes the true color of white. This produces a baseline from which all other colors are measured. White may not “white” under all lighting conditions, so this helps correct it. White balance can be automatically determined by the camera, chosen from a list of presets, or manually set by the user.
Understanding color temperature. The reason why setting white balance is necessary comes down to the color of the light upon the subject, also called the color temperature. Whether dealing with natural light outdoors or man-made lighting fixtures indoors, light can come in a wide variety of intensities, values and temperatures.
There are three ways to calibrate this balance of most cameras, thought some cameras may only offer one option: Auto, presets, and manual.
What is exposure compensation?
Exposure compensation basically helps you override automatic exposure adjustments your camera makes in situations with uneven light distribution, filters, non-standard processing, or underexposure or overexposure. It lets you take control of your image’s brightness by manually increasing or decreasing exposure.
Exposure compensation works differently depending on your camera mode.
Aperture priority mode. Here you manually set your aperture, while the camera automatically sets a shutter speed. Exposure compensation in this mode works by changing the shutter speed to get the right exposure.
Shutter priority mode. Essentially the opposite of aperture priority mode, you manually set the shutter speed while the camera automaticlally sets the aperture. Exposure compensation the works by changing the aperture to the right exposure.
Program mode: This allows you to manually set both your aperture and shutter speed. Here, exposure compensation works by changing your shutter speed.
What does image quality mean?
When talking about photography the term “image quality” also referred to as “IQ” is characteristic of an image that measures the perceived image degradation (typically, compared to an ideal or perfect image).
Factors that affect quality include the brightness and evenness of illumination, contrast, resolution, geometry, color fidelity and color siscrimination of an observed image. Achieving the highest possible image quality relies not only on using the best available equipment, but also making correct photographic choices. Correct use of exposure, lighting techniques, and post processing techniques all effect the overall quality of an image.
S / M / L / raw?
Image size is measured in pixels: (examples shown below)
Small - 2992x2000 (basic)
Medium - 4496x3000 (normal)
Large - 6000x4000 (fine)
(Approximate size when printed at 300 dpi.
Record photos in JPEG format. Compression increases and file size decreases as quality progresses from “large through medium to small”. In other words - you can shoot more images in small, but the file size is reduced and quality is affected.
Raw images takes up more space, but offers more options in post processing.
Information on camera settings such as exposure compensation, white balance, and picture controls are stored separately from the raw data from the image sensor and can later be modified as often as desired with with no deterioration in image quality.
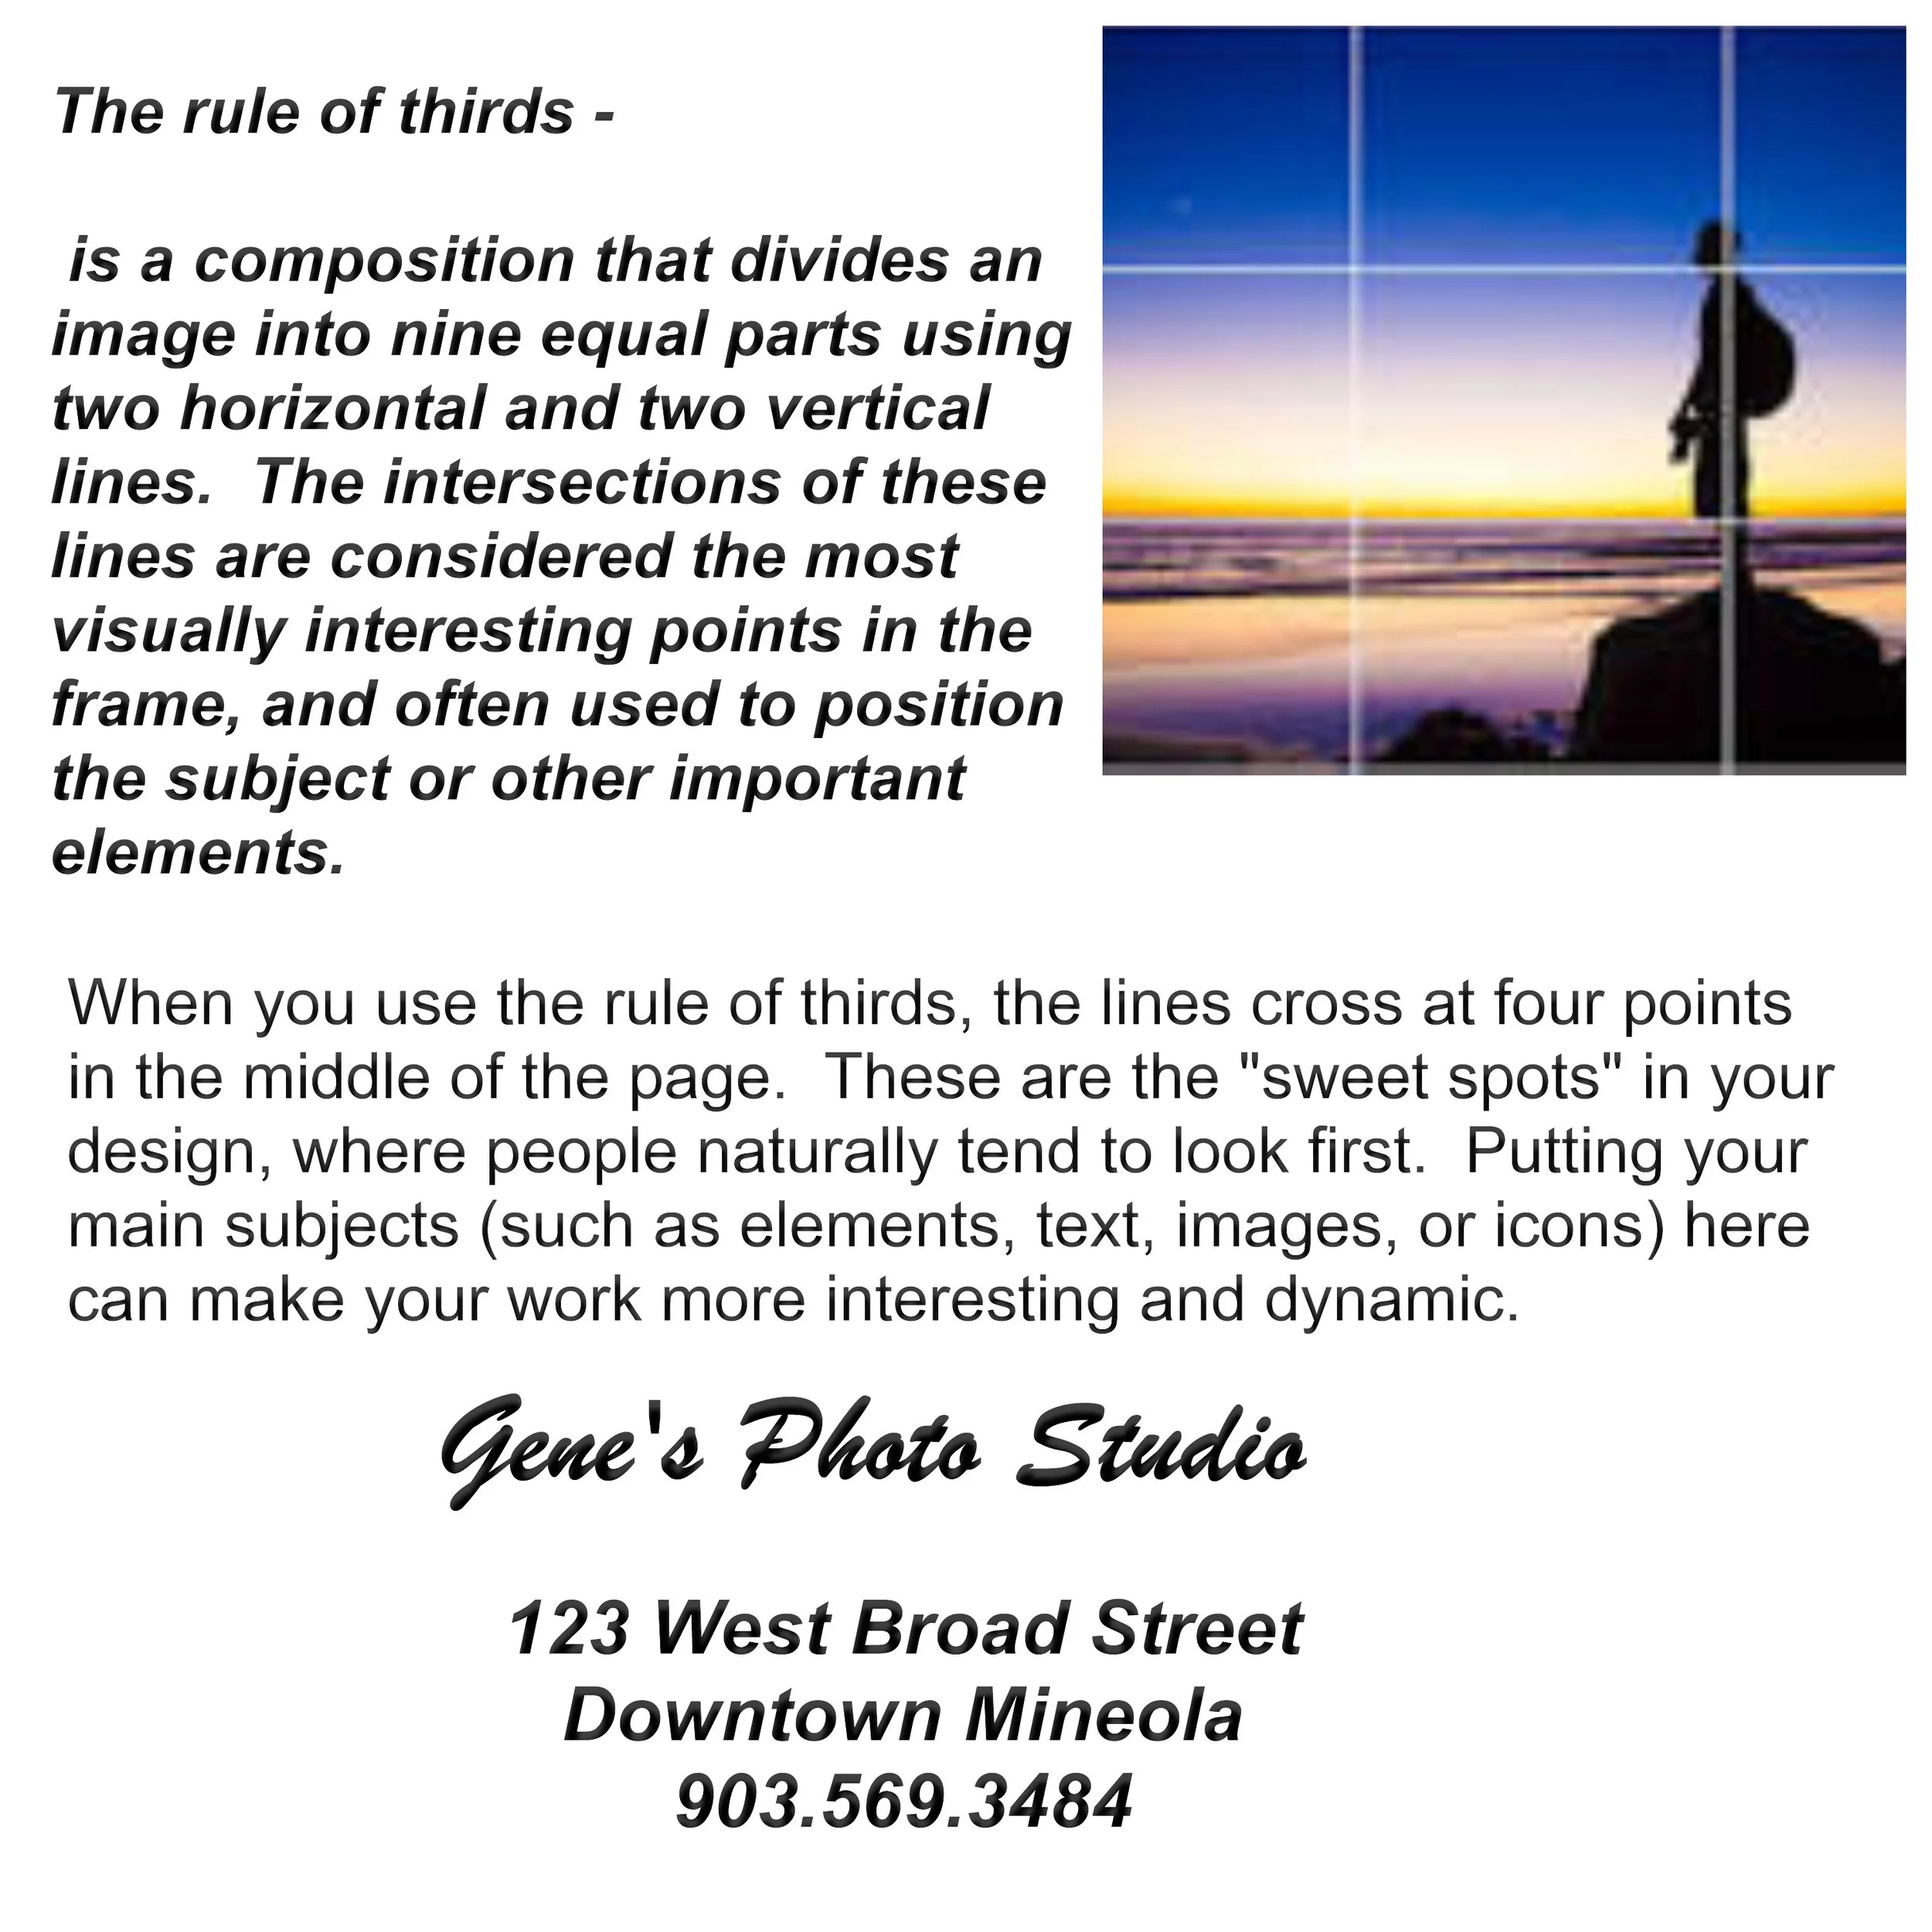
What is the Rule of Thirds?
The Rule of Thirds - is the process of dividing an image into thirds, using two horizontal and two vertical lines. This imaginary grid yields nine segments with four intersections points. When you position the most important elements of your image at these intersections, you produce a much more natural image (in theory). It is also suggested that any horizon is placed on either the top horizontal line or bottom horizontal line. Off-center composition is pleasing to the eye because it’s typically where the eyes go first. When there is a subject of object off center, it also give viewers the ability to interact with that space between the. This allows for interpretation and conversation between the subject and the background, as opposed to fully centered subject.