
C O N F U S E D ?
T o o m a n y b u t t o n s . . .
L i g h t i n g . . .
W E C A N H E L P ! ! !


C A M E R A F E A T U R E S E X P L A I N E D
Gene’s Photo Studio offers a class explaining features on your camera with on-site shooting. One hour explaining the features and One hur on-site, your location (Mineola only)………………………………………………………………………………………………$99


Jpeg vs raw?
A Joint Photographic Experts Group (JPEG) - file is a lossy raster file format the compresses an image to make the file smaller. JPEG giles are some of the most popular and widely used image formats in the world.
A RAW file contains all the uncompressed and unprocessed image data captured by the sensors of a digital camera or scanner. They are also a tyupe of raster file format, but on that maintains lossless quality. RAW files are not images - they’re just large files filled with image data as it was captured.
The main difference between any JPEG and RAW file is the size. RAW files are significantly bigger than JPEG (and any other) image file format.
JPEG files are a much more manageable size because the data they contain is compressed.
The main advantage of shooting in RAW is that you end up with high-quality files to edit into the best possible image.
JPEG images are already processed, so can be quickly transferred from the camera and opened with editing software, or sent directly to someone, with not post processing. Their smaller size makes transfers fast and avoids any camers slowdown when shooting, too.
With RAW files, you need to factor in the time it will take to process and convert the file into a JPEG, PNG, or TIFF. This means storing two versions of the same image, which uses up more storage space, and leads to longer backups and transfers. It can also cause camera slowdown when shooting RAW, meaning yuour frame rate may fall.
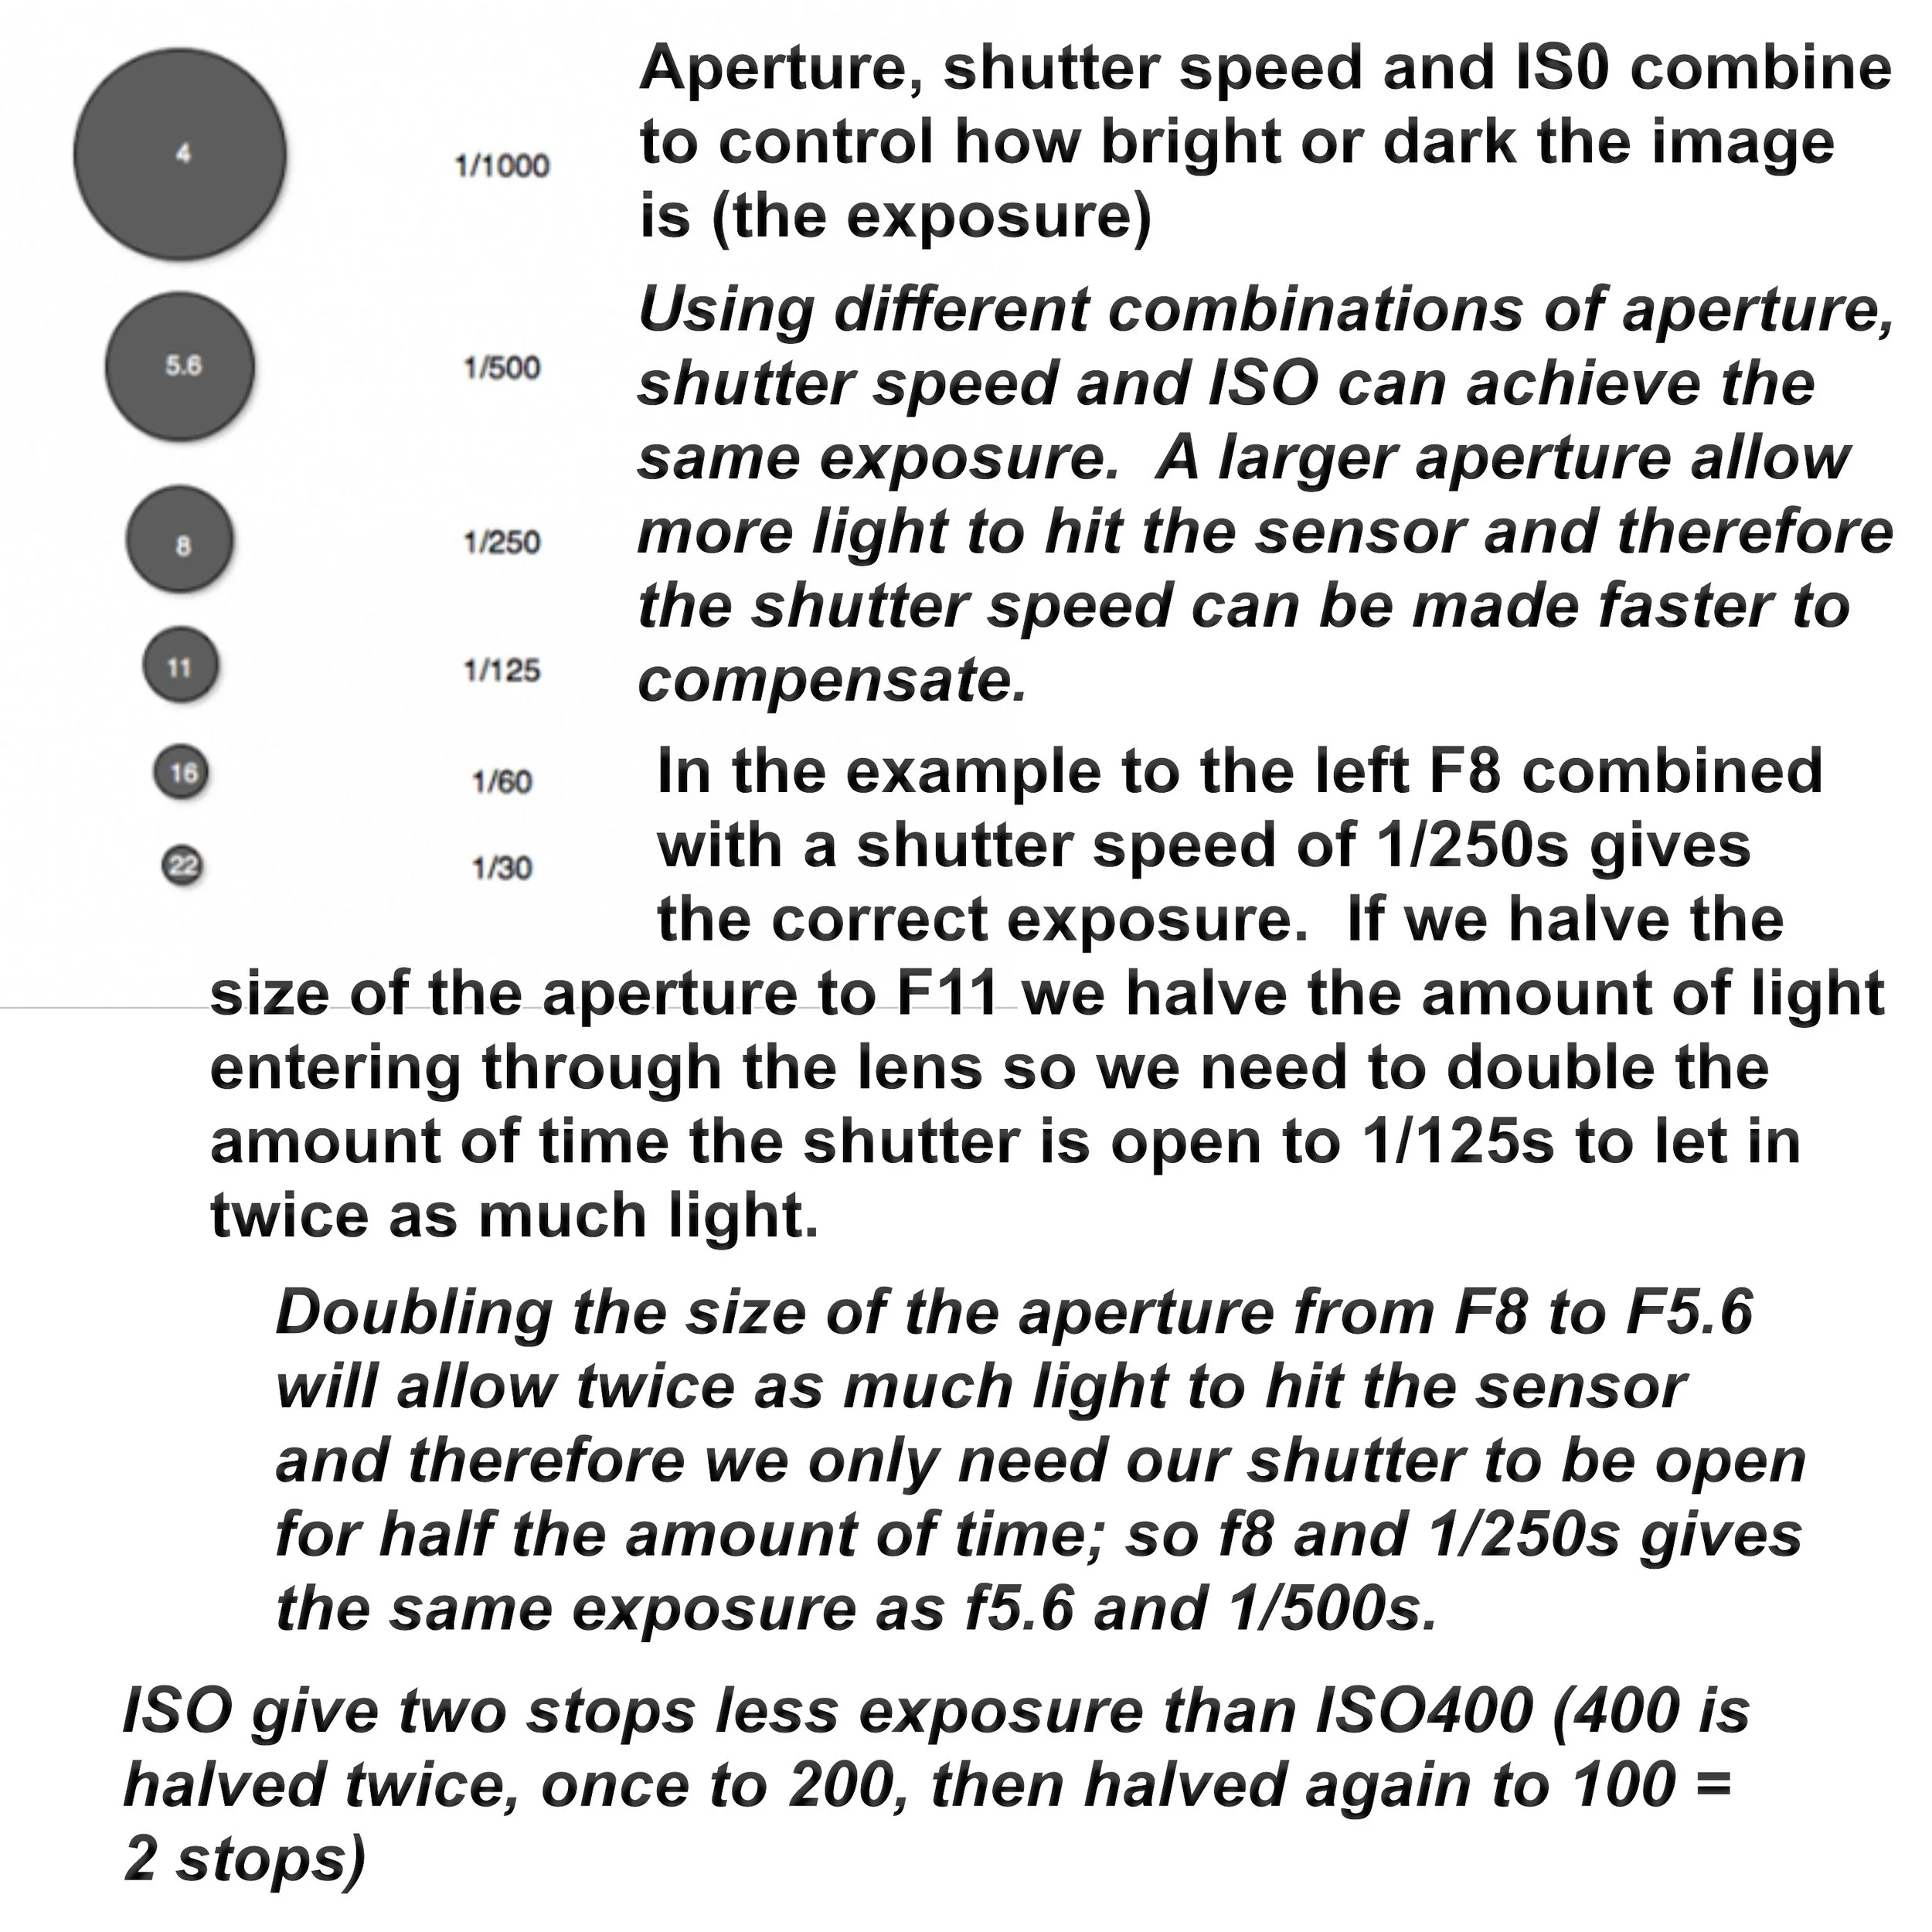
Changing the Aperture and Shutter Speed without changing the exposure…
…and not changing the ISO - When you change the aperture from f 8 to f 11, the amount of light is cut in half - likewise, when you go from f 11 to f 8, the amount of light is doubled.
When the shutter speed is changed form 1/125 to 1/250 the length of time the is cut in half - like wise, when you go from 1/250 to 1/125 the length of time is doubled.
For instance, an average exposure on a bright day outside at ISO 100, the basic exposure would be 1/125 @ f 11
Take for instance this scale:
f stop f 4 f 5.6 f 8 f 11 f 16 f 22 f 32
shutter speed 1/1000 1/500 1/250 1/125 1/60 1/30 1/15
Each one of these setting will give you the same exposure - by cutting the amount of light, and doubling the amount of time the shutter is open, it gives you the same exposure. by doubling the amount of light, and cutting the amount of time the shutter is open, it give you the same exposure. WHY DO THIS . . .
If you want to increase / decrease your DOF (depth of field)
If you want to stop action
There are trade-offs for each!
Drive Modes
Single image shooting -it does exactly what is says. Every time you press the shutter button it records a single image. In fact, the camera will still take just one image even if you keep your finger down on the shutter button.
Continuous shooting - When using this drive mode, your camera will take photos for as long as you keep your finger pressed down on the shutter release button - or until the camera’s buffer (its temporary memory) or memory card is full. when using continuous shooting mode you will also want to consider which AF mode to use. Something else to consider is that most modern cameras now offer two continuous shooting drive modes: high and low, however, be warned that some cameras struggle to focus continuously when shooting at these high frame rates.
Self-timer - When using the self-timer drive mode, your camera will wait specific number of seconds before releasing the shutter and taking the picture.
Remote release - Some cameras now offer a remote release mode that allow you to fire the shutter using a wireless remote control.
Mirror lock-up - To help minimize the blur caused by camera shake, most DSLR cameras feature what is called the Mirror Lock-up mode. However, just to confuse things, this option isn’t always found in your main Drive Mode setting menu. Often it is tucked away elsewhere within you main menu system.
Auto-Exposure Bracketing - Your camera’s auto-exposure bracketing mode is another useful feature that photographer use quite often. If you’re unfamiliar with the concept of bracketing, generally it means taking a series of images, each at slightly different settings and choosing the best one.
Understanding Metering
Metering is how your camer evaluates the light of a scene to determine the correct shutter speed, aperture, or ISO.
Back in old days of photography … cameras were not equipped with a light “meter”, which is a sensor that measures the amount and intensity of light. Photographers had to use hand-held light meters to determine the optimal exposure.
Today, every digital camera has an integrated light meter that automatically measures the reflected light and determines the optimal exposure. The most common metering modes in digital cameras today are:
1. Matrix Metering / Evaluative Metering - is the default metering mode on most digital cameras. It works by dividing the entire frame into multiple “zones” which are then all analyzed on a na individual basis for light and dark tones.
2. Center-weighted Metering - evaluates the light in the middle of the frame and its surroundings and ignores the corners. Compared to Matrix /Evaluative, Center-Weighted Metering does not look at the focus point you select and only evaluates the middle area of the image.
5. Spot Metering - only evaluates the light around your focus point and ignores everything else. It evaluates a singe zone / cell and calculates exposure base on that single area, nothing else. Spot metering works great for back-lit subjects.
4. Highlight-weighted Metering - many cameras have a highlight priority metering mode, which has an indicator icon similar to that of spot metering but with a star beside it. Highlight priority metering aggressively protects the highlight in your shots. This can be very useful if you have some brighter areas near you subject that you don’t want to overexpose.
ISO…
The acronym ISO stands for “International Organization for Standardization”. However camera ISO doe not directly refer to the organization that creates various technology and product standards. Ever since two film standards called ASA and DIN were combined into ISO standards in 1974, they were referred to as one word “ISO” from that point on. Although ISO initially defined only film sensitivity, it was later adopted by digital camera manufacturers with the purpose of maintaining similar brightness levels as film.
Quite simply, when you double your ISO speed, you are doubling the brightness of the photo. So, a photo at ISO 400 willbe twice brighter than ISO 200, which will eb twice brighter than ISO 100.
Autofocus or Manual focus?
Autofocus (AF) - is the function of a camera to automatically focus on a subject. Most general digital cameras have this function. There are various AF methods, and the available methods are different depending on the mode of your camera to use different methods according to the scene or subject you want to photograph.
The following explains the AF methods:
AF-S (Single-shot AF) - Autofocus operates when the shutter button is pressed halfway down. Once the subject is in focus, the focus is locked. It is suitable for photographing motionless subjects such as landscapes or snapshots.
AF-C (Continuous AF) - Auto focus continues to operate and keeps adjusting the focus while the shutter button is pressed and held halfway down. It is suitable for photographing moving subjects such as sports or railway photography.
AF-A (Automatic AF) - When the shutter button is pressed halfway down, the camera automatically recognizes whether the subject is moving or not, and switches the AF mode between AF-S and AF-C accordingly. Use this mode to photograph various subjects at the same time, or to avoid switching the AF mode manually.
Direct Manual Focus (DMF) - You can make fine adjustments manually after performing auto focusing, letting you focus on a subject more quickly than when using manual focus from the beginning. This is convenient in situations such as macro photography.
Manual focus (MF) - Manual focus is the function to let the photographer adjust the focus manually instead of the camera. Although autofocus (AF) shooting is more typical in digital camera, MF is effective when focusing is difficult with autofocu, such as in macro shooting. In MF, you can adjust the focus position by turning the focus ring on the lens.
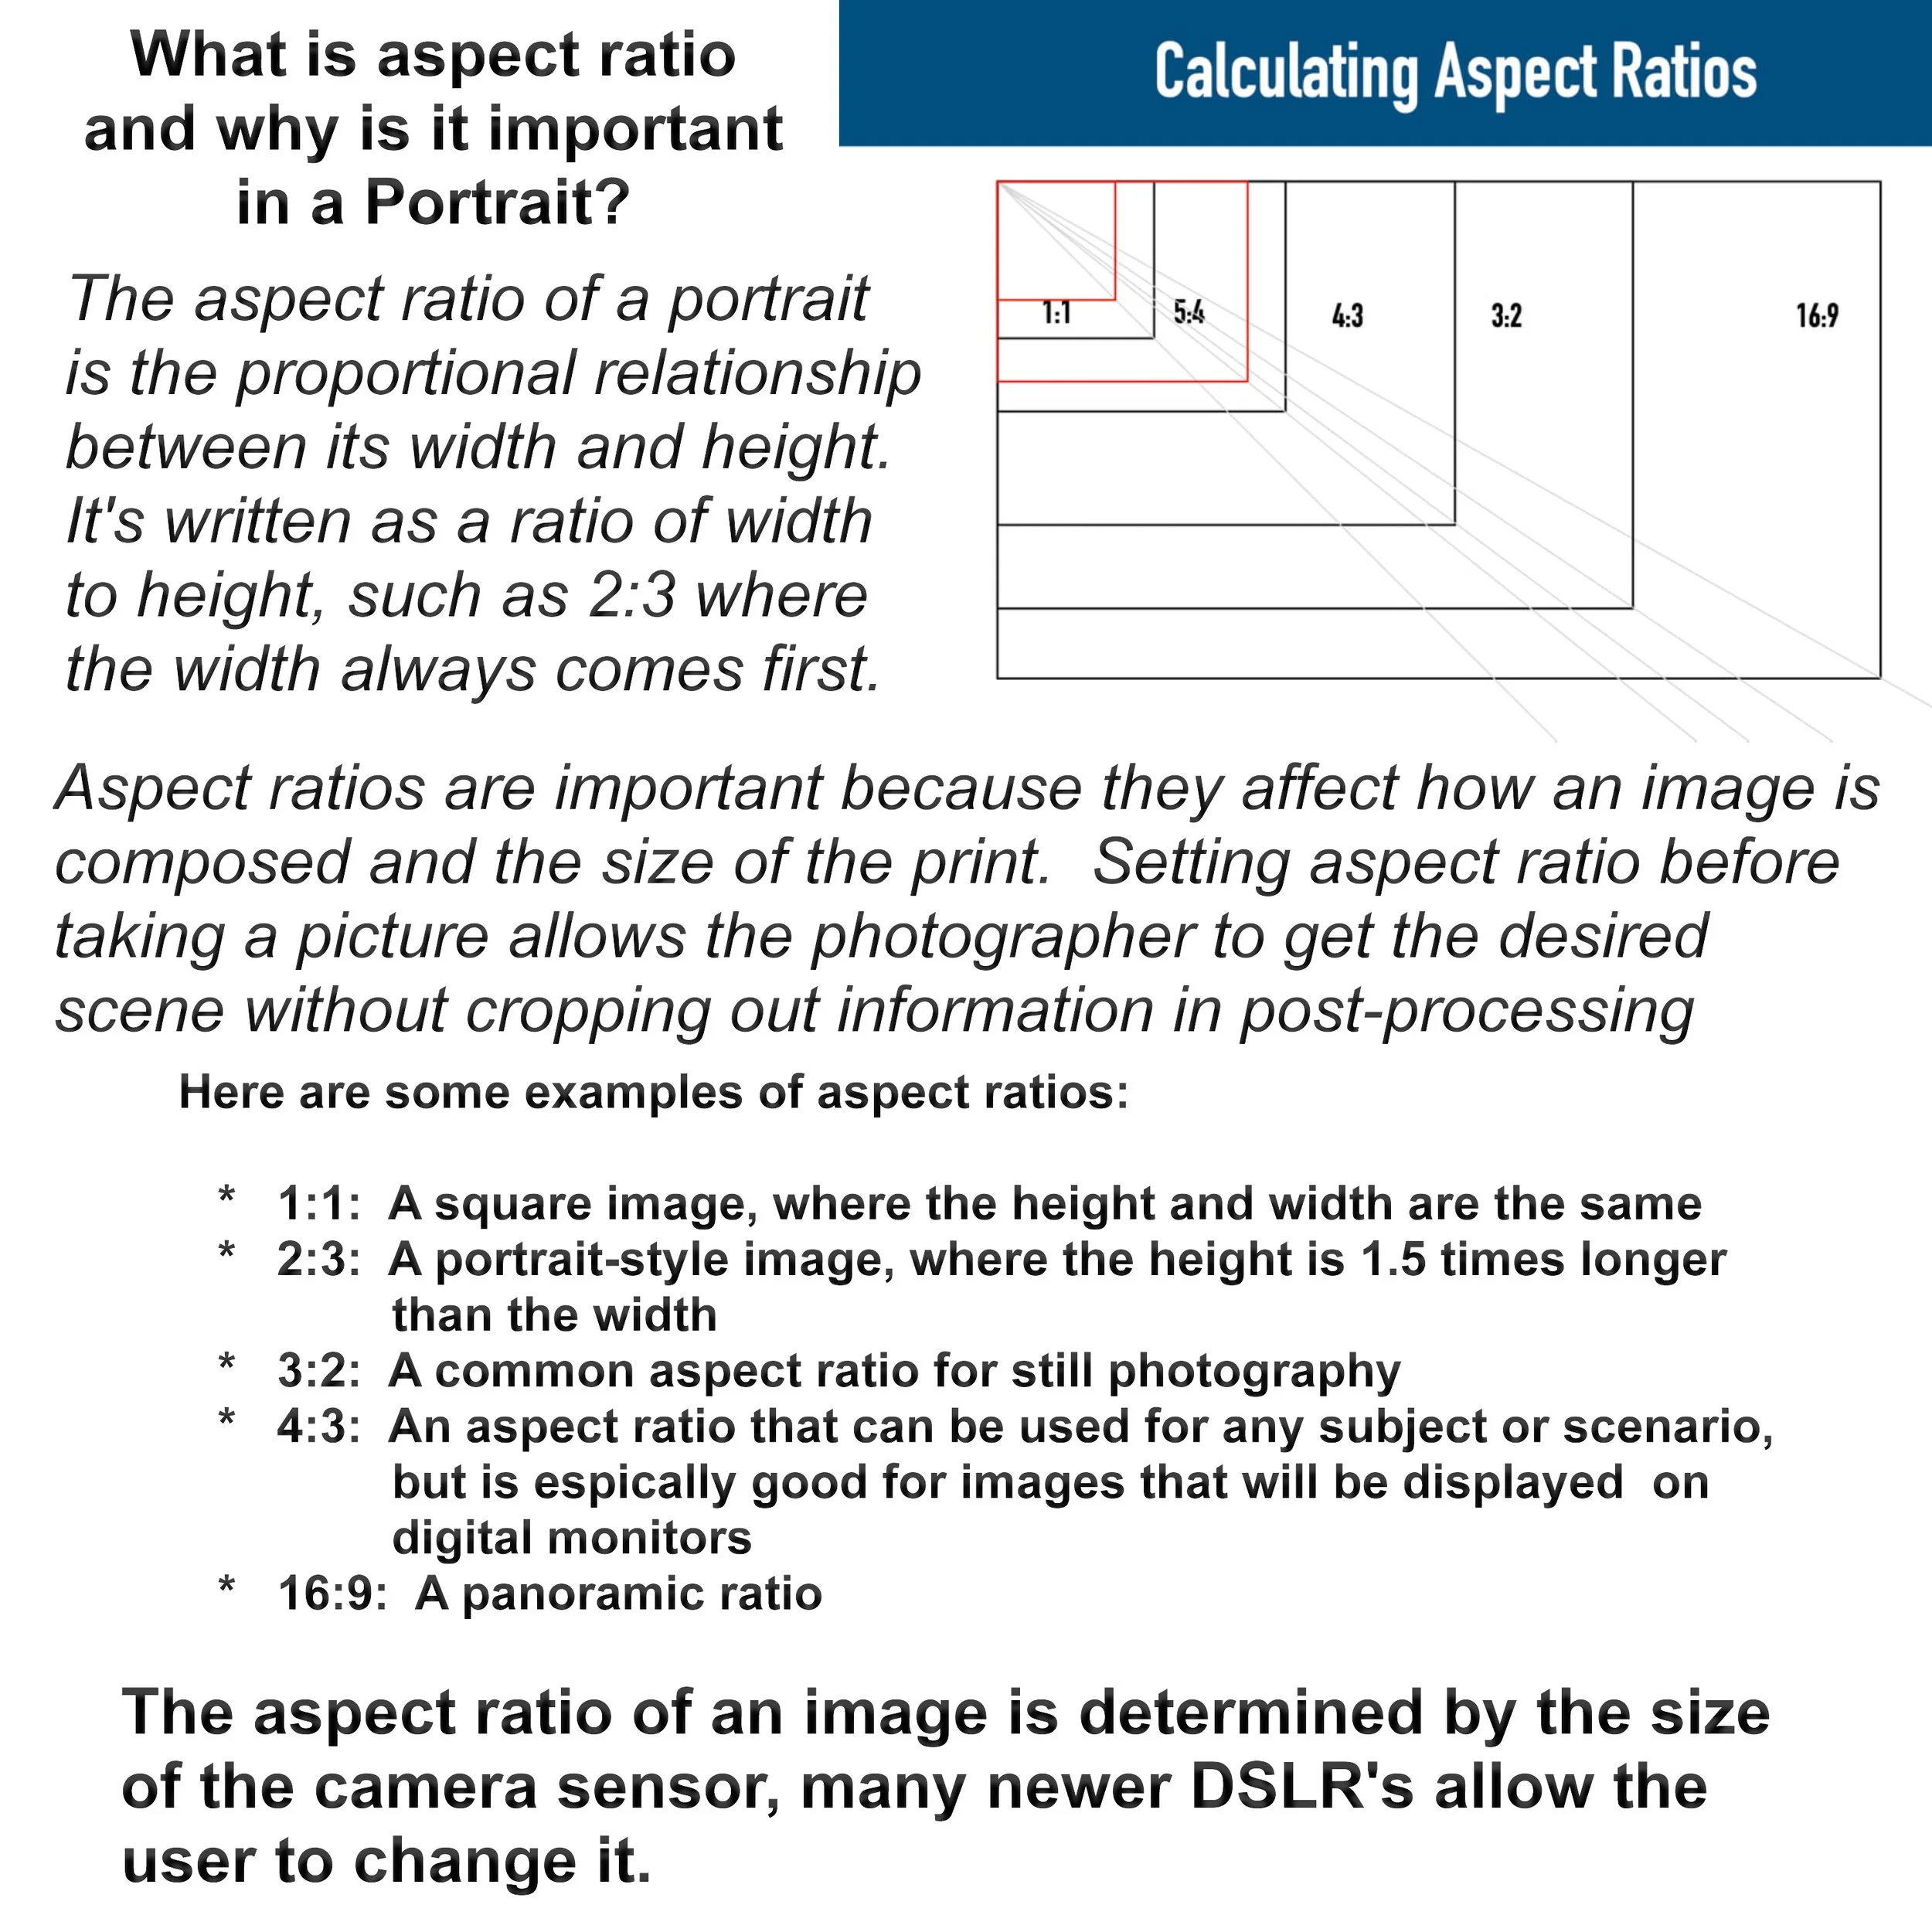
Depth of field (DOF)
The depth of field is the distance between the nearest and furthest objects that are in acceptably sharp focus in an image captured with a camera. In short, the largest f stop number (f 16 / f22) has a greater depth of field than an f stop number that has a smaller number (f2.8 / f4)
TV / AV / P / M / Auto / B ?
Which shooting mode should I use?
Auto - is the point and shoot setting. The camera’s meter reads the light, chooses the aperture, shutter speed and ISO for you, assuming conditions are just right, attempts to achieve a good exposure.
Manual -You control and select all the camera settings to create your own perfect exposure based on the light and conditions as you see them!
Semi-Auto (AV, TV) - You set one of the elements you want to control, and the camera decides on the rest, based on its reading of the light…
What Are AV & TV? - AV and TV sit somewhere in middle between Manual and Auto.
They’re generally known as partial Manual modes. AV mode stand for Aperture Value, and TV stands for Timer Value. AV controls your aperture, and TV controls your shutter speed.
When to Choose the AV mode - You start by deciding what aperture value to shoot with, then the camera will coose a shutter speed and ISO to go with your chosen aperture value to achieve correct exposure.
The camera will continuously adjust those two setting to compensate as the light changes, or as you or your subject move around AV allows us to select the aperture that best suits your desired shot.
When should you use AV or TV modes? - By choosing AV or TV mode, we can dictate the most important setting for the situation.
When shooting a race or sports in general, shutter speed is important to freeze the motion. Then you can rely on the camera to monitor and adjust the aperture and ISO, in this case, you can just point and shoot, but with a little more control than full Auto.
Likewise, there may be a situation where you want the effect of a specific aperture setting, and shutter speed and ISO isn’t as important. Here, you would choose AV mode, and rely on the camera to adjust the shutter speed and ISO.
So why would you use Manual Mode? - Confused…Whenever your camera’s sensor detects even the most subtle change of light, it assumes it needs to adjust its setting to compensate. Additionally, the sensor will be tricked by things like large expanses of highlight (think bright white sky) or shadows (such as a dense area of foliage or a person wearing all black). In those situations, the camera will also adjust its settings. The result? a series of images with inconsistent exposures, and literally hours in post-processing trying to match them all up.
So, while AV and TV modes are handy when you want good but not perfect or consistent exposure, when you’re creating art or simply want full control of your im ages. Manual is the only way to go!
Program Mode -the camera selects and sets both the shutter speed and the aperture. For any given brightness of light, the camera has been programed to set a specific combination of shutter speed and aperture.
In low light, for example, the camera might set 1/30 second and f4. In bright light it might set 1/500 and f11. At first sight, this appears similar to the basic zone Full Auto setting. However, there are differences.
Unlike Full Auto (green square) mode, program mode lets you set a range of different camera functions, including ISO value, white balance, color space, focus mode, metering mode, exposure compensation and flash control. Bull Auto is a point-and-shoot mode. Program mode is the thinking photographer’s Full Auto.
Program Shift -This is what really moves program mode into the Creative zone. This feature allows to vary the shutter speed and aperture values, whilst keeping the exposure the same.
Bulb Mode - is simply a shutter speed option that you can select in Manual mode on your camera. It allows your shutter speed to be any length you choose: one second, one minute, one hour etc. The key with the bulb mode is that your camera’s shutter stays open for as long as you hold down the shutter release button.
Camera Settings…???

The exposure triangle - There is not single camera setting for exposure. Instead, exposure is made up of three different data settings. Those settings are shutter speed, aperture and ISO.
EXPOSURE…IS TTHE AMOUNT OF LIGHT CAPTURED BY THE IMAGE SENSOR OF A CAMERA. If too much light gets to the sensor, the picture is washed out or too bright.. Conversely, if not enough light get to the sensor, the image will be underexposed or too dark.
Aperture - The size of the lens opening, measured in f/stops. Aperture controls the depthof-field which is the area that is in focus in the picture. Aperture can be used to draw attention to one part of the picture. One thing to remember is that the f/stop numbers are smaller for larger openings and numbers are larger for smaller aperture openings i.e. f/1.4 is larger opening and f/22 is tiny. A little confusing I know…
Shutter Speed - The amount of time the sensor is exposed to the ldight measured in fractions of a second. Shutter speed can be used to freeze a subject with a fast speed of 1/250 or faster or it can be used to blur motion with a slow speed like 1/4. You can also adjust shutter speed to capture images in low light scenarios IE: increasing the amount of time the cameras sensor is exposed to image/light. In shis situation, you usually need a tripod so that you don’t blur your photograph.
ISO -The light sensitivity of the image sensor. The smaller number (like 100) is considered low and is not very sensitive and number like 1600 is high and is very sensitive to light. The higher the ISO speed, the faster the camera gathers light, but it also adds noise to the photograph. Most of the time you should keep the ISO at the lowest setting if there is enough light around you to get the shot you want. Sometimes though, the only way to get a shot is to crank up the ISO. A noisy shot is better than no shot at all.
Why Northern Light?
Genesis 1: 3
Then God said, “Let there be light”; and there was light.
Have you ever wondered why “Northern Light” is so desirable for Photographers?
The short answer is - the sun travels east to west...so a north facing window never receives direct sunlight, so you always get a soft lighting with soft shadows.
If you have questions about photography - text me @ 903.245.5490 or e-mail gary@genesphotostudio.com
Gene's Photo Studio now offers to rent their "Light Studio Room" with Northern lighting. Excellent for natural light portraits or videos. 903.569.3484 office / 903.245.5490 cell
Downtown Mineola, est: 1947
Reflectors . . . What is that?
Directing the light
There is more to photography than understanding how a camera works. Understanding light, the way it spreads and bounces. Some objects absorb light, others bounce it back in another direction. A reflector is a tool that helps a photographer manipulate the light by providing another surface for the light to bounce off of. Reflectors are inexpensive tools that can make a big impact on your images.
The short answer is dark objects absorb light and light objects reflects light.
Gobo . . .
Controlling the light
In photography, a GoBo or a “Go-Between Object” can be introduced to add contrast and interest to a flat scene by of a shadow pattern. It’s a subtractive device that cuts out light from the light source with opaque elements that create shadows on the background, floor or the subject itself. This item is furnished at Gene’s Photo Studio.
Benefits of Natural Light
Choosing the right time of the day
Natural light photography offers the following benefits to professional and amateur photographers alike:
It’s affordable. There’s no need to purchase expensive artificial light sources.
It offers variety. Natural light photos vary depending on the time of day that they are shot. A photo taken during the Golden Hour will look markedly different from one taken in the middle of a sunny day, which in turn will look different from a photo at dusk, or even at night (with a very long shutter speed).